In this article, we will discuss Tags in WordPress and the benefits of using tags in the articles of your WordPress website.
Let’s find out more about WordPress tags and how we can use them on the website.
What are WordPress Tags?
WordPress Tags is a default taxonomy that allows you to group related posts on your website. It provides a way to organize your content, help visitors find related content on your website, and improve user experience.
Generally, tags are displayed on the post block or the post’s detailed page. Below is an example of a post block where tags are displayed at the bottom.
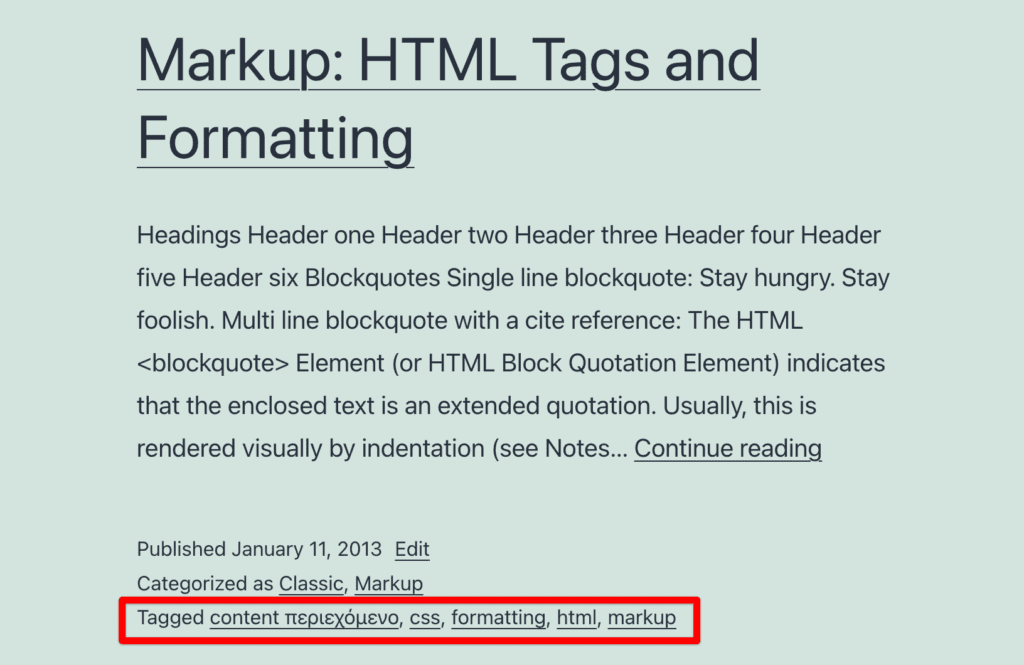
Unlike WordPress categories, you can add multiple tags to a post based on the type of your blog post which will help find similar posts with the same tags to the users.
Why use Tags in WordPress?
Tags are an optional feature in WordPress. You must be wondering why use Tags when it is not mandatory. It’s up to you to add WordPress tags to your posts and publish posts without tags. However, adding tags to the posts can improve visitor engagement and improve the overall SEO of your website.
When readers click on a particular tag, they can view other similar posts that use the same Tags. It links to all the related posts allowing users to look for the desired content.
It also gives a clear indication of what your post is about and relates to, so make sure to use words that define your content. There is no limitation to the number of Tags you can use for your post.
Tags in WordPress also have massive benefits on SEO and help rank your page on Google and other search engines. You might have seen Tags in many web contents and can have several Tags given to a particular content.
WordPress Tags vs. Categories: What’s the difference?
WordPress tags and Categories are both default types of taxonomies in WordPress that can be used to group articles into similar Tags and Categories that improve content management and eventually user engagement on your website. But there are some technical differences between them and how you can use them properly.
Categories in WordPress are also used to group related posts. However, categories are hierarchical in order i.e. a category can have a parent-child relationship with one another. Whereas, tags are non-hierarchial, standalone entities and do not have any parent-child relationship.
Categories are also used to group a broad range of topics and it is a best practice to assign a post to one of the categories. Whereas, tags are more specific and unique to the content of the post.
For example, if you have a post on the book “Lord of The Rings”, an epic fantasy novel, you can use Tags and Categories as below:
Categories: Fantasy, Adventure
Tags: Novel, J. R. R. Tolkien, Middle-Earth
When your readers click on these tags they will be able to view similar posts.
Using many Categories for a single post is not a good idea. Use more than one category only when it’s necessary and makes sense to your readers.
You might also like: How To Add Categories in WordPress?
There are no restrictions on the number of Tags you can use for a post.
Is There Any Benefits of Using Tags in WordPress?
Technically, there are some benefits of using WordPress tags on the post, sidebar or footer than not having them anywhere on the website. Below are some of the benefits you can use by adding tags in your WordPress website:
- Adding tags helps you organize your website’s content.
- Using tags makes it easy for your visitors to navigate through similar content and improve user experience hence giving your SEO a boost telling Google that your site is offering relevant content.
Hope you now have some understanding of Tags in WordPress. So, let’s see how you can add Tags.
How to Add Tags in WordPress?
There are a couple of ways by which you can add tags to a post in WordPress. The first and the quickest way of adding Tags in WordPress posts is by creating them while writing your post.
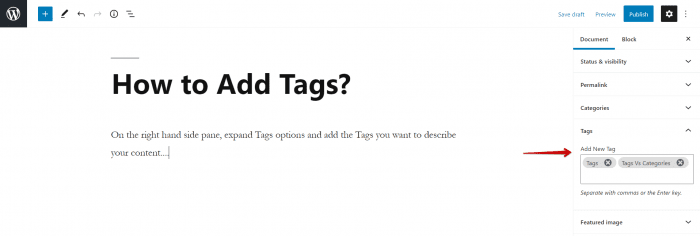
As shown in the image above, find the Tags block on the right-hand side of your editor. Expand it, and then enter the Tags you want to add. When you start typing on the Add New Tag field, it will automatically suggest the existing tags which you can select from the dropdown. If you are creating a new one, then hit enter when you have typed the tag in the field.
Another method is by going to the WordPress dashboard and going to Posts >> Tags page.
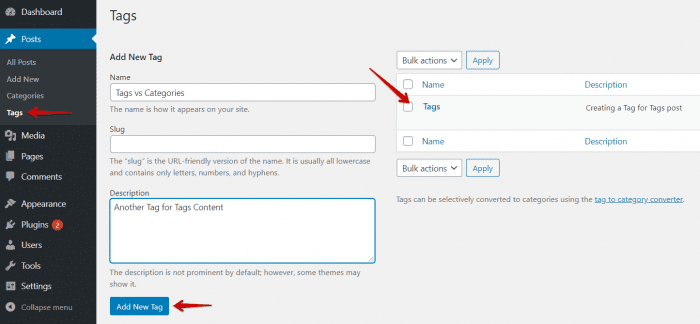
After you have clicked on the Tags option, you should see a page as shown in the image above. Create a Tag by adding its name in the left section of the page and click on the Add the New Tag button when done. The right section shows the tags you have created until now.
Slug and Description fields are optional but can be added as per your preference and how you want it to be accessible or displayed on the front end. Make sure you keep it simple.
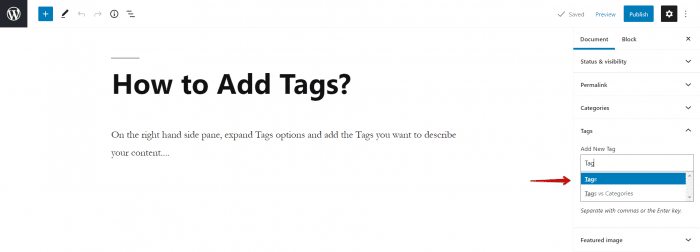
Once you have created Tags, go to the post you were working on and expand the Tags block on the editor. Type the first 2 letters of the tag you want to assign to the post. A dropdown list will appear. Select the Tags to assign from the list to this particular post.
You can see the Tags you had created earlier as shown in the figure below.
How to Edit Tags in WordPress?
Once you have created the tags, you see something is not correct. You feel that you want to change the existing tag name to something else. Then it is essential to know how to edit Tags in WordPress.
Editing Tags is super easy in WordPress. You can edit Tags by
- Going to your WordPress dashboard.
- Go to Posts >> Tags in the backend. You’ll find existing lists of Tags in the page.
- On the Tags page, hover around the Tags you want to edit. You will see the options such as Edit, Quick Edit, Delete, and View. Click on the Edit link of that particular tag you want to edit.
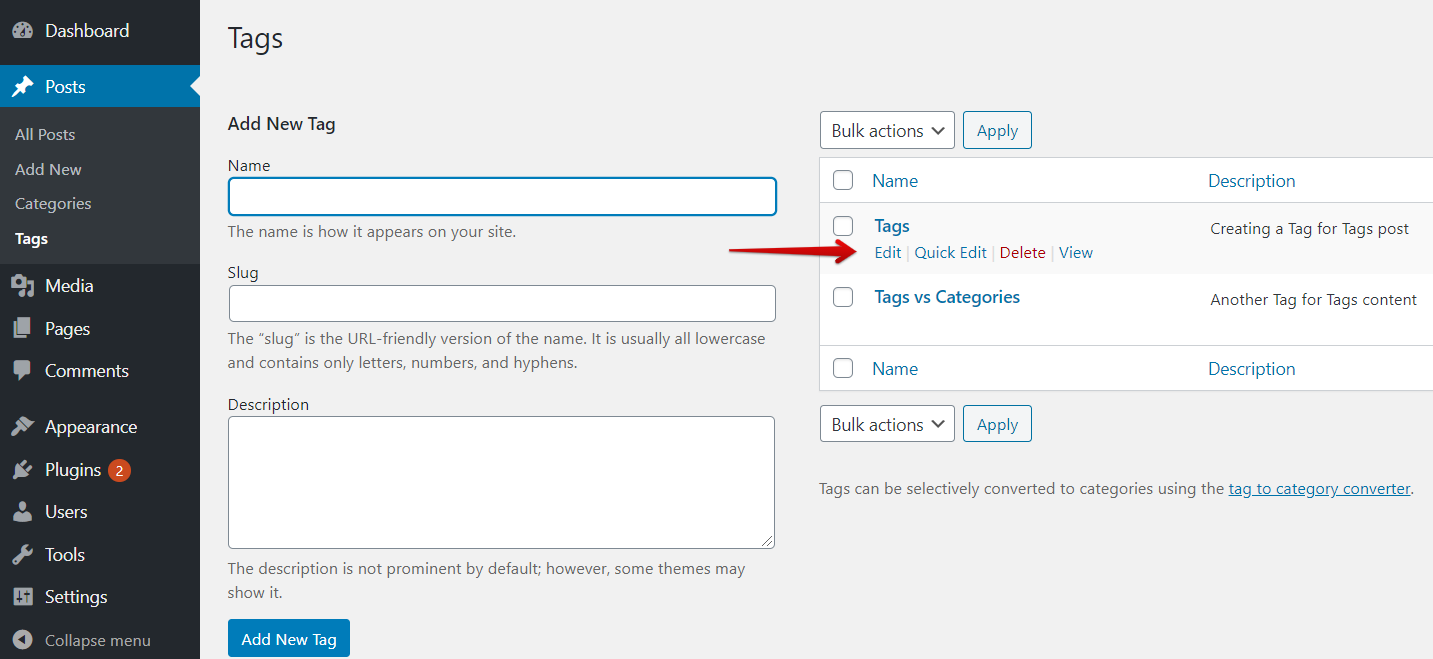
- If you choose quick edit mode you can only change the Tags name and Slug. While in Edit mode you can also make changes to Tags description. After editing, click on the Update button.
How to Delete Tags in WordPress?
Similar to Edit, it is easier to delete the Tags in WordPress. Once you delete the tags it will be permanently deleted and cannot be restored.
- Go to the Tags lists page once again in the WordPress admin dashboard.
- Hover over the tag you want to delete and click on the Delete link. A popup will appear at the top of your browser asking you to confirm if you want to delete it.
- Click on Ok if you want to proceed or click on Cancel if you don’t want to delete it.
You’ve now successfully deleted a Tag in WordPress.
If you want to delete Tags in bulk at once,
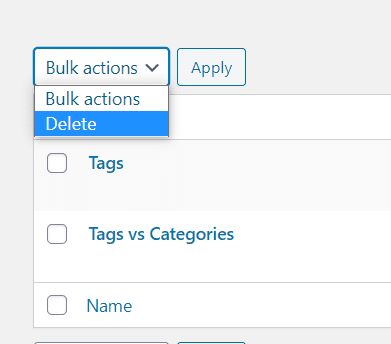
- Click on the Bulk Actions menu in the Tags lists page then select the Delete option.
- After that select the Tags you want to delete by selecting the checkbox and click on the Apply button.
How to display Tags in the front-end?
Now that you have added tags to your content, let’s learn how we can display them on your site.
It is important to display tags on the front end of the website so that readers can see the tags on the website and explore other related content by clicking through the tags.
The position where the Tags get displayed will depend on the WordPress themes installed. Most of the WordPress themes provides the capability to add sections or blocks to the front end of your WordPress websites via Widgets. WordPress Widget are pre-defined components to add various features to the website’s using little to no code.
Let’s take for instance, the WordPress theme you have installed allows you to add tags to the Footer to the webiste.
Simple Steps To Display Tags In WordPress Sites With Widgets
- From your WordPress Dashboard, go to Appearance >> Widgets
- If you have installed a WordPress version older than 5.0, you need to find the Tag Cloud widget, which should be under the Available Widgets section. Drag and drop the Tag Cloud from Available Widgets to the Footer section.
- If you have a WordPress version after 5.0 (the version when Gutenberg was released as a part of WordPress core), then click on the + sign in the Footer Section, search for Tag Cloud, and select it to the Footer section.
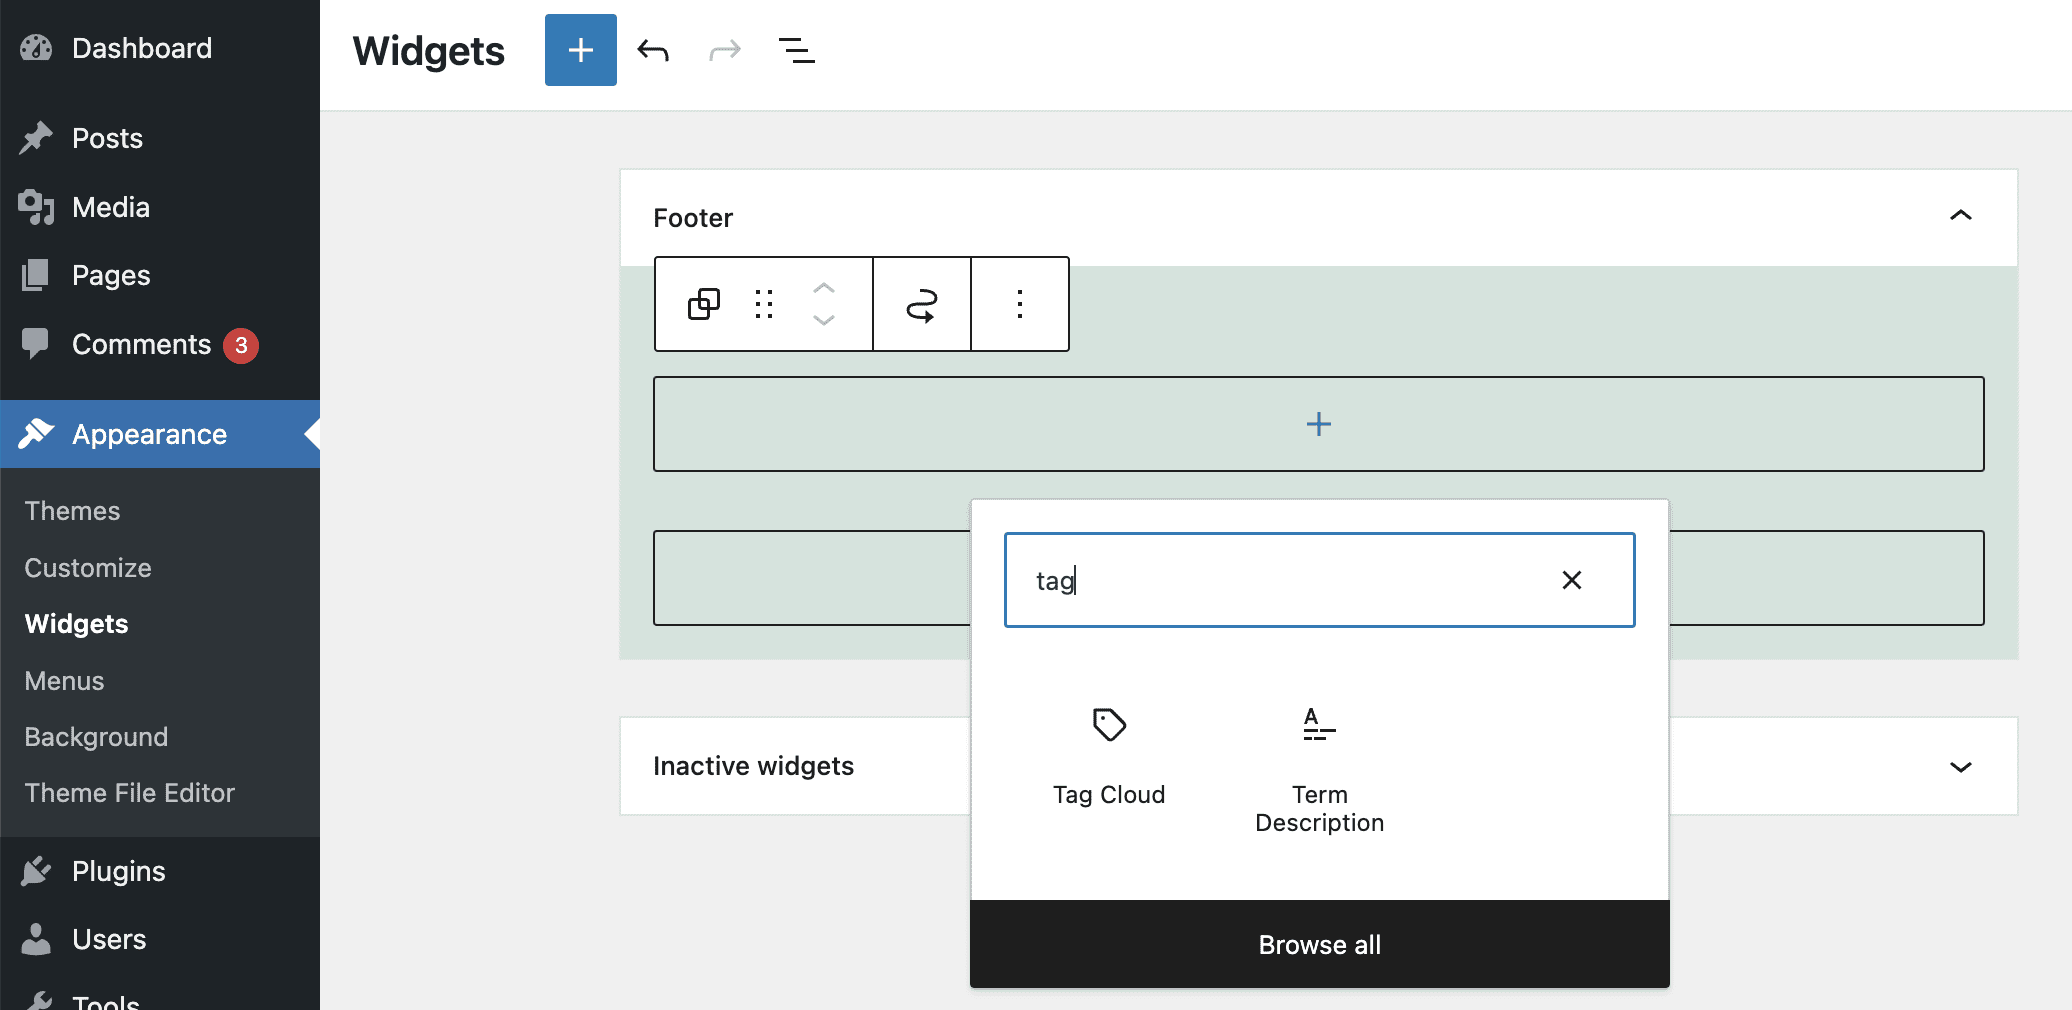
- You can change the number of tags you want to display from the right-hand side of the page under the Block Settings.
- In the end, click on the Update button.
- That’s all, go to the front end of your website and see if Tags appear or not on the footer.
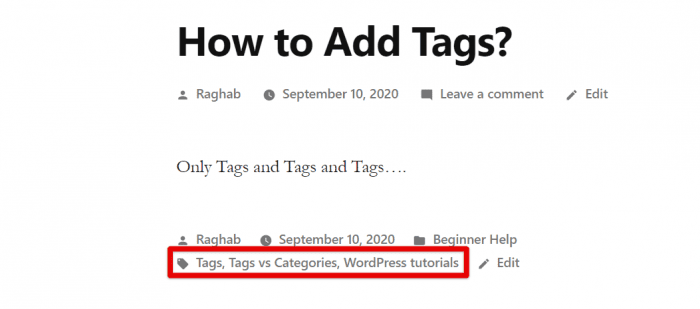
Below is an example how Tags are displayed on the bottom of the content. This is depended on the theme you are using.
Some themes allows displaying tags by default, some themes has settings options provided to toggle to display or not to display the tags, whereas some themes need to add code to display them in the template files of the theme.
Conclusion
We hope this article helped you have some knowledge about Tags in WordPress and how to include them in your sites. By using relevant and specific tags, you can help your visitors find relevant and useful articles by improving their overall experience on the website.
FAQs on Tags in WordPress
Are Tags a default taxonomy in WordPress?
Yes, Tags is a default taxonomy in WordPress. It is one of the WordPress feature to allow you to arrange the blog posts of your website and help users to navigate through the related content. They highlights a specific aspects of your blog posts rather than the broader idea of the posts like Categories.
Unlike Categories, Tags are non-hierarchial and do not have parent/child relationships with its Tags terms.
Should I use Tags in WordPress?
It is best to use tags in WordPress as it improves the accessibility and usability of the website. Hence, improvers the user experience of the website.
It best to keep the tags used in a WordPress post to a reasonable number like 7-10 tags in a post and preferably unique in the meaning from one another. It is also best practice to keep the words to be only one or two in the tags.
Additional Resources
You may also want to see some related articles for beginners on WordPress.

